Ground floor stair railing
1. Create new railings
1.1 Stair railing
VisualARQ doesn’t provide the option to generate railings linked to stairs. For that reason we will create them from curves that we will get from the stair.
- Select and isolate (_Isolate
 ) the stair for a better workflow.
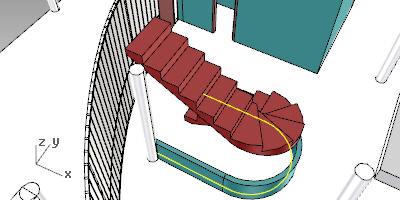
 - Run the _DupEdge command
 and select the lower edges of the stair slab. (These edges might not be highlighted during this command due to a current limitation that requires a fix).
 - Join the curves of the arch. Activate the control points of the two segments of the arch, and move one of the end points next to the other’s segment end point. Finally run the _Join
 and select the two curves to convert them into a single one.
 - Rebuild the curves. The duplicated edges might have a big number of control points (specially the curved one), which would lead to take a long time to generate railings from them. In order to improve that, run the _Rebuild command on the curved arch, and change the number of control points to a lower value (for example: “15”) and keep the degree to “3”.
- Join the 3 segments to convert them into one open curve.
- Run the _vaRailing command
 and select the option “FromCurves” in the command line (or run directly the vaRailing > From Curves command, in the Railing toolbar), select the railing insert options (style “wall fence”, alignment “right”), and select the open curve generated before.

1.2 Railing wall in the ground floor:
- Create a planar _polyline
 following the stair contour in order to create the wall fence below the stair. Switch from Polyline to Arch in the command line to draw the arch in the middle segment.
 - Run the Wall > From curves command
 to create a 0.6m high wall (Generic 100 style) from that curve.
1.3 Middle railing wall

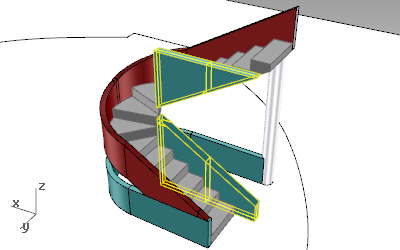
- Create a new wall style for the fence placed in the middle of the stair in the Wall styles dialog (_vaWallStyles)
- Insert the wall in the model (_vaWall
 ) .
) . - Create a _Polyline
 in the Front viewport which will be used to generate a polysurface that you will subtract from the wall. Make sure the “Project” snap point is on.
 - In the Perspective viewport, _Extrude
 this curve. Make sure the extrusion intersects the wall.
 - Run the _vaWallSubtractSolid command
 to subtract this polysurface from the wall.
 - Turn the central wall control points on
 . Extend the wall from the vertical control arrow until it reaches the top stair surface. Notice that when you extend the wall it respects the original solid volume used for the wall subtraction even if the solid is not visible anymore (you can undo the Wall: Subtract solid and recover the solid with the Wall: Extract solids command
  ).
).
2. Create and edit railing styles
Back to Index menu
