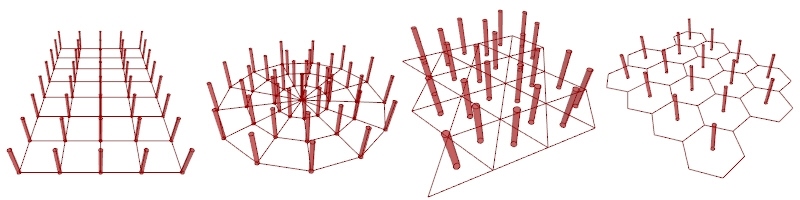
Exercise 3. Create a Grid of Columns
This exercise shows how to create VisualARQ columns arranged in a grid pattern in Grasshopper.
The current exercise uses a Rectangular Grid component, but you can use any other grid component (Hexagonal, Radial, Square or Triangular).
1. Create the grid:
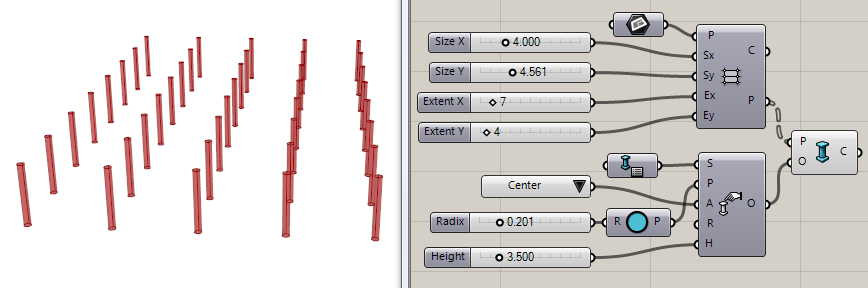
- 1. Drag a Rectangular Grid component (Vector Tab > Grid)
 to the Grasshopper canvas. This component has different inputs that define the grid number of cells (Ex, Ey), and the grid cell dimensions (Sx, Sy).
 - 2. Use different Number Slider components to define the values of these parameters. The C output determines the grid cell outlines, and the P output determines the points at grid corners.
2. Insert the columns
- Drag a Column component
 to the Grasshopper canvas. This component has two inputs:
- P: Column insertion point. Determines the position of a column in the model.
- O: Options to specify all column parameters.
- 2. Specify the column insertion points. Connect the P output of the Rectangular Grid component to the P input of the Column component. A column will be created in each grid corner point.
3. Define the column parameters
- 1. Drag a Column Options component
 to the Grasshopper canvas. This component has different inputs which define the column parameters.
 - 2. Plug the Column Options O output into the Column component O input.
- 3. Set the different Column Options:
- (S) Column Style:
 You can drag a Column Style component to the canvas, plug it to the S input of the Column Options. This Column Style component has a standard style assigned by default. To assign a different style, right click on this component and select the “Set one Column Style” option from the list. Grasshopper will be hidden until you select a column style from the list displayed in the new pop-up dialog. This list shows the existing column styles available in the Rhino document you are working on. (To edit or create new column styles, minimize the Grasshopper window and open the Column Styles dialog box, “_vaColumnStyles” command.)
 - (P) Column Profile: The column profile determines the shape of the sectioned column. This shape profile must match current column style profile, otherwise Grasshopper will detect an error and the column won’t be created.
- (A) Column Align:
 The column alignment determines the position of the column insertion point according to its profile shape. Drag a Column Alignment component to the canvas and plug it to the A input of the Column Options. Click on the Column Alignment component and select one of the nine options: (0=Top Left, 1=Top Middle, 2=Top Right, 3=Midlde left, 4=Center, 5=Middle Right, 6=Bottom Left, 7=Bottom Middle and 8=Bottom Right).
 - (O) Column Alignment Offset: This value defines the distance of the column to its insertion point.
- (R) Rotation: This value determines the rotation of the column profile in the XY plane.
- (H) Height: Column height.
- (S) Column Style: