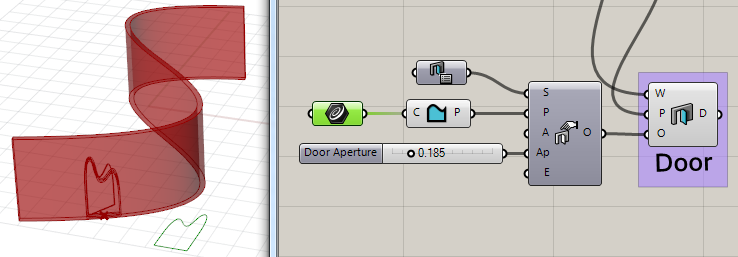
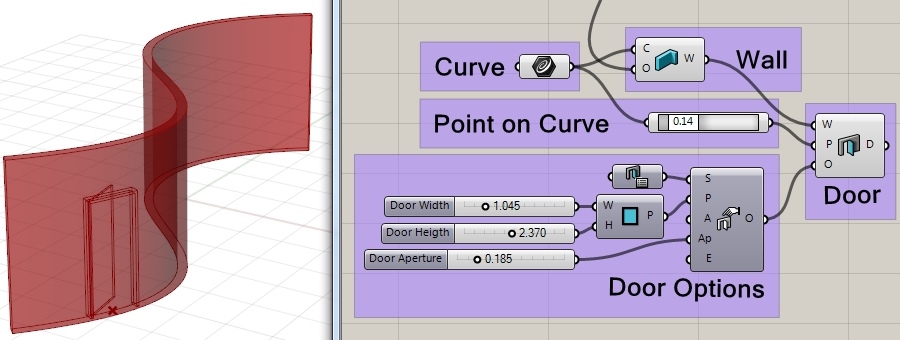
1. Drag a VisualARQ “Door” component onto the Grasshopper canvas. This door component has three inputs:
W: Wall where the door will be inserted.
P: Door insertion point. Determines the positionof a door in the model. If that point is not located along the wall path curve, the door will be inserted in the nearest point.
O: Options to specify all door parameters.
2. Assign a wall to this door: Connect the W output of a Wall component previously created into the W input of the Door component.
3. Select the door insert point. There are different ways to do this:
Choose an existing point in the model: Right-click on the P input of the Door component and choose the “Set one Point” or “Set Multiple Points” option from the list. Grasshopper will be hidden until you select one existing point in the model (you can also put a Point Param on the Canvas, set a Point to this component, and plug it into the P input of the Door component.) A door will be created for each chosen point
Point on Curve: drag a Point on Curve Component (under the Curve Tab) onto the Canvas and plug it into the Door component P input. Plug the curve used to generate the wall where the door is inserted into the Point on Curve component. This Component will find a point along the curve that goes from 0.00 (start point) to 1.00 (end point).
2. Define the Door parameters:
1. Drag a Door Options component onto the Grasshopper canvas. This component has different inputs which define the door parameters.
2. Plug the Door Options O output into the Door component O input.
3. Set the different Door Options:
(S) Door Style: You can drag a Door Style component onto the canvas, plug it into the S input of the Door Options. This Door Style component has a standard door style assigned by default. To assign a different style, right click on this component and select the “Set one Door Style” option from the list. Grasshopper will be hidden until you select a door style from the list displayed in the new pop-up dialog. This list shows the existing door styles available in the Rhino document you are working on. (To edit or create new door styles, minimize the Grasshopper window, and open the Door Styles dialog box, “_vaDoorStyles” command.)
(P) Door Profile: The door profile determines the shape of the door opening inside the wall. Doors take by default the corresponding profile of the door style.
(A) Door Alignment: The door can be aligned according to three methods within the wall width: Interior, Center and Exterior, and two positions of the door height: Top and Bottom. Drag a Door Alignment component onto the canvas and plug it into the A input of the Door Options. Click on the DoorAlignment component and select one of the six options: (0=Bottom Interior, 1=Bottom Center, 2=Bottom Exterior, 3=Top Interior, 4=Top Center and 5=Top Exterior).
(O) Door Alignment Offset: This value defines the distance of the door to the wall.
(Ap) Aperture: The door aperture is measured as a percentage that defines how open or closed the door leaves are displayed. If this value is = 0.00, the door leaf or leaves are closed. If this value is = 1.00 the door leaf or leaves are opened 100% (180º in Swing type doors). If you put a negative value (i.e -1), the door will open towards the other side of the wall.
(E) Elevation: A door elevation is always measured in relation to the baseline of the wall it is inserted in.
3. Edit the Door Profile
Change the existing door profile dimensions: If you want to modify the current door profile dimensions, find the corresponding door profile (i.e. Rectangular) , in the Profiles Tab, drag it onto the canvas and plug it into the P input of the Door Options component. You can insert a numeric component (i.e. a Slider component) and plug it into the W (Width) and H (Height) inputs of the Rectangular profile.
Assign a custom profile: to assign a different profile for the door, plug a Custom Profile component into the Door Options P input. This Custom Profile works as a converter of any kind of shape into a valid profile for doors. The shape must be taken by a Closed and PlanarCurve and can be either selected from an existing curve in the model (its alignment inside the wall will be determined by the XY coordinates of the plane where the curved is contained) or generated in Grasshopper). If the curve is not planar or closed, the door will ignore this custom profile and will be generated with the current door style profile.
3. Bake the door:
When you think the door object is ready to become a workable door object inside Rhino, you can bake it. Take into account that you need to bake the wall where the door is inserted, otherwise the door will be floating in the model until it finds a wall to be inserted in.
 onto the Grasshopper canvas. This door component has three inputs:
 on the Canvas, set a Point to this component, and plug it into the P input of the Door component.) A door will be created for each chosen point
  (under the Curve Tab) onto the Canvas and plug it into the Door component P input. Plug the curve used to generate the wall where the door is inserted into the Point on Curve component. This Component will find a point along the curve that goes from 0.00 (start point) to 1.00 (end point).
 onto the Grasshopper canvas. This component has different inputs which define the door parameters.
 You can drag a Door Style component onto the canvas, plug it into the S input of the Door Options. This Door Style component has a standard door style assigned by default. To assign a different style, right click on this component and select the “Set one Door Style” option from the list. Grasshopper will be hidden until you select a door style from the list displayed in the new pop-up dialog. This list shows the existing door styles available in the Rhino document you are working on. (To edit or create new door styles, minimize the Grasshopper window, and open the Door Styles dialog box, “_vaDoorStyles” command.)
 The door can be aligned according to three methods within the wall width: Interior, Center and Exterior, and two positions of the door height: Top and Bottom. Drag a Door Alignment component onto the canvas and plug it into the A input of the Door Options. Click on the Door Alignment component and select one of the six options: (0=Bottom Interior, 1=Bottom Center, 2=Bottom Exterior, 3=Top Interior, 4=Top Center and 5=Top Exterior).
 , in the Profiles Tab, drag it onto the canvas and plug it into the P input of the Door Options component. You can insert a numeric component (i.e. a Slider component) and plug it into the W (Width) and H (Height) inputs of the Rectangular profile.
 into the Door Options P input. This Custom Profile works as a converter of any kind of shape into a valid profile for doors. The shape must be taken by a Closed and Planar Curve and can be either selected from an existing curve in the model (its alignment inside the wall will be determined by the XY coordinates of the plane where the curved is contained) or generated in Grasshopper). If the curve is not planar or closed, the door will ignore this custom profile and will be generated with the current door style profile.